A Step-by-Step Guide to Manually Installing WordPress Themes
WordPress themes are the backbone of any WordPress website, offering customization, styling, and various functionalities to site owners. While there are multiple ways to install these themes, manual installation is a crucial skill for those wanting more control over their site’s design and for troubleshooting common issues. This guide will walk you through the manual installation process, help you understand the structure of theme files, and teach you how to update themes to keep your site running smoothly.
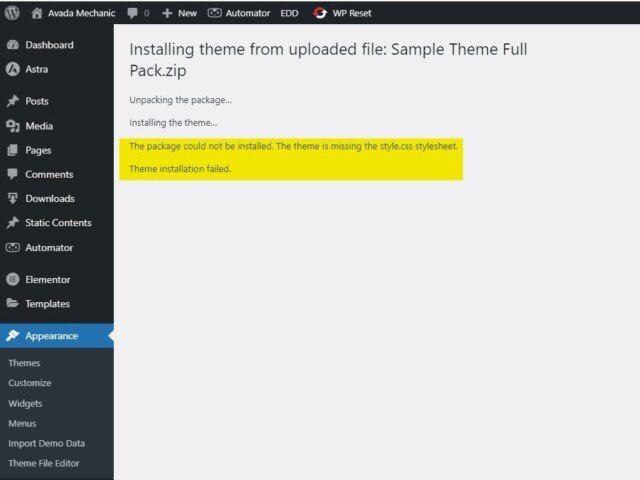
Error: The theme is missing the style.css stylesheet
The most common error you see when uploading a WordPress theme
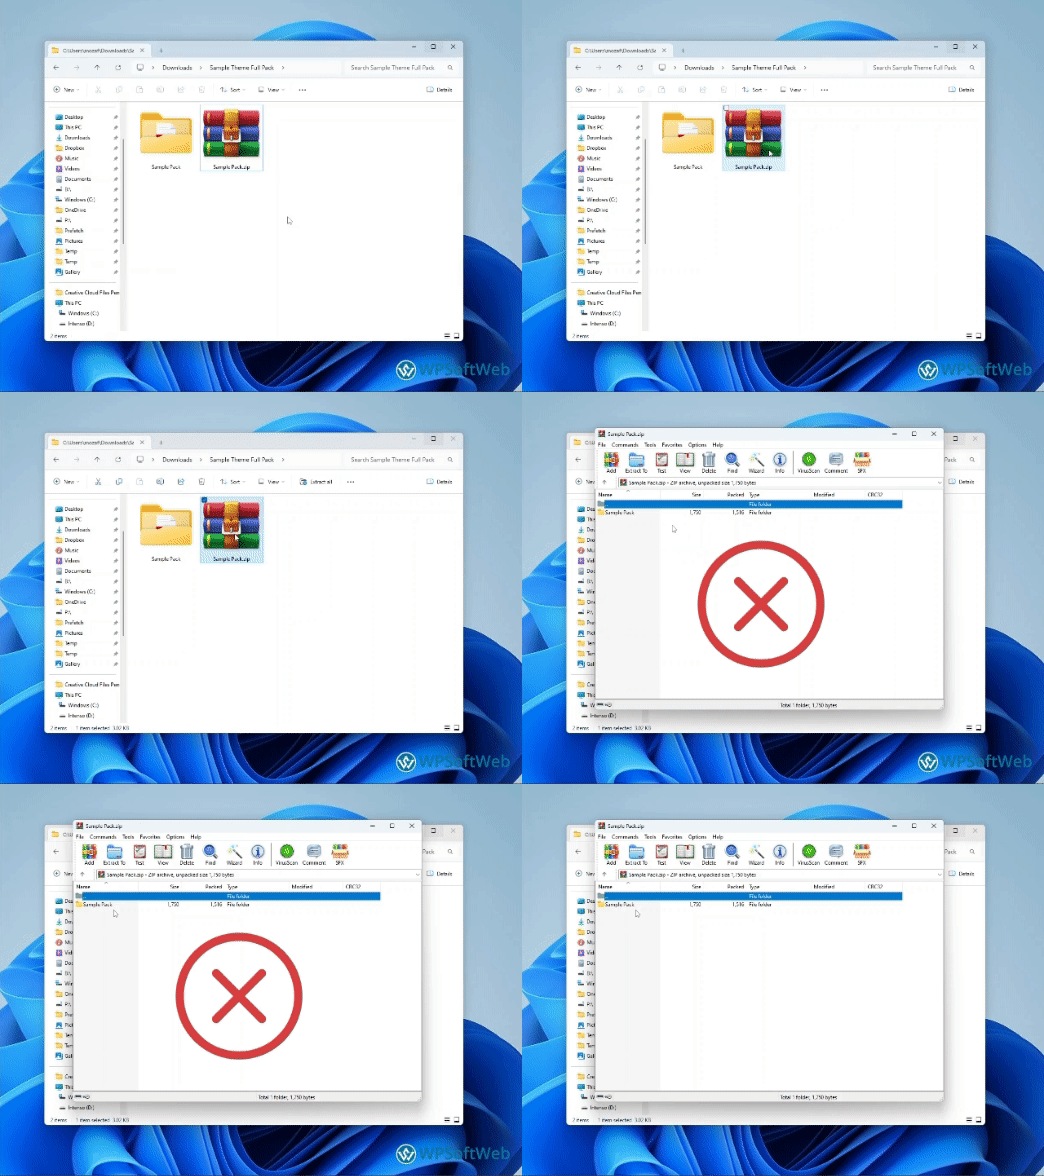
This usually happens when the user uploads a wrong file to WordPress instead of the theme file. The theme package often includes various versions, documentation, help files, and more, which are not meant to be uploaded directly to WordPress.
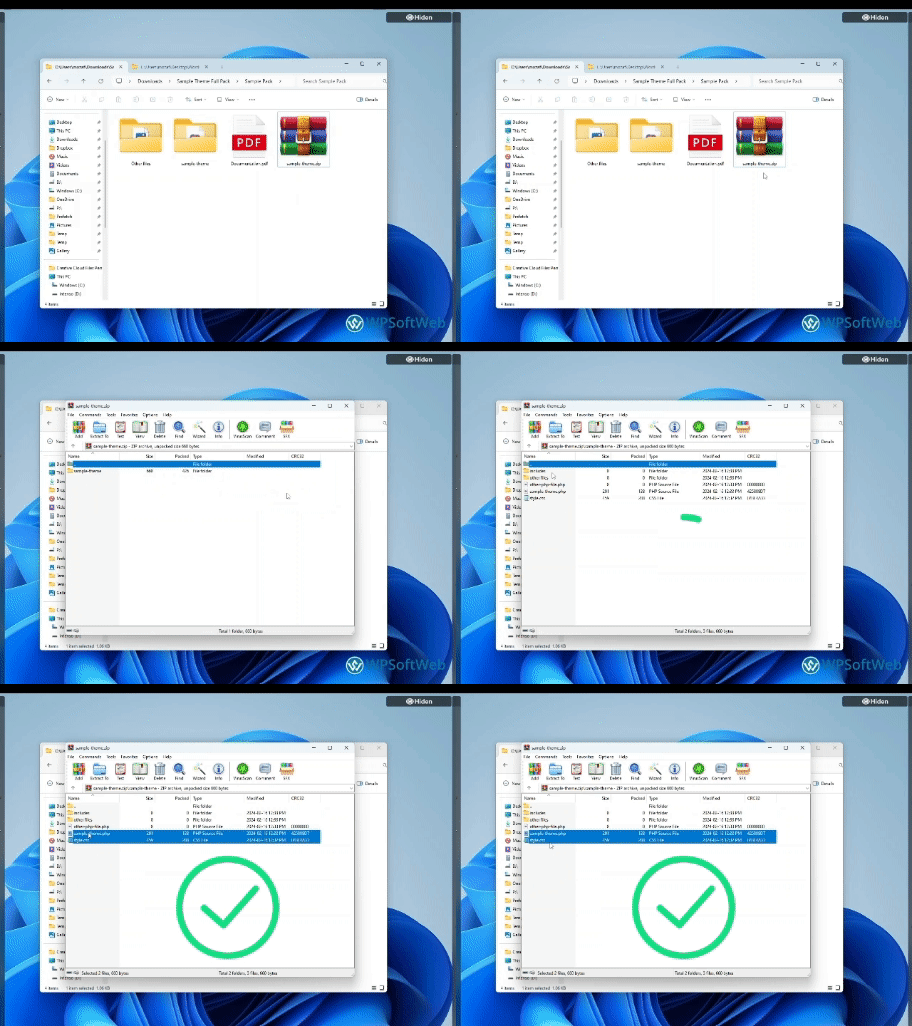
Before diving into the installation process, it’s essential to understand what a WordPress theme zip file contains and how to distinguish it from other types of files. A common mistake some users make is uploading the entire theme package they’ve downloaded, which often includes not just the theme itself but also various versions, documentation, licensing information, and helper tools or files. Attempting to upload this entire package to WordPress can lead to the frustrating “Theme is missing the style.css stylesheet” error. The key file that distinguishes a theme zip file from non-theme files is the style.css file, which must be present in the root of the zip file you intend to upload to WordPress. This file contains the theme header that WordPress reads to recognize the theme’s name, version, and other meta information.

The Core of a WordPress Theme: Understanding the Main File
To navigate this issue, it’s crucial to understand what constitutes a WordPress theme file. A theme zip file is a compressed folder containing all the necessary files (PHP files, stylesheets, scripts, images, etc.) that together create the theme’s appearance and functionality. The most vital component of this collection is the style.css stylesheet, which not only provides the styling instructions for your theme but also contains the header information WordPress uses to recognize and install the theme properly.
When examining a theme package, look for a .zip file that typically bears the theme’s name. This file should not contain extraneous folders when opened, but rather, it should directly display the theme’s files and directories. Distinguishing the correct zip file from the entire package is the first step to ensuring a smooth theme installation process.


Unraveling the Mystery: Manually Installing WordPress Themes
1. Manual Installation of the Theme in the WordPress Panel
Manually installing a WordPress theme through the admin panel is a straightforward process that offers a more hands-on approach than automatic installations. Here’s how to do it:
Finding the Right Theme File: Ensure you are working with the correct zip file containing the theme. This file should only include the theme’s files and directories, with
style.cssbeing easily locatable at the root level.Accessing the WordPress Admin Area: Log in to your WordPress dashboard and navigate to Appearance > Themes.
Adding a New Theme: At the top of the Themes page, click the Add New button, followed by the Upload Theme button.
Uploading the Theme: Choose the correct zip file from your computer and then click Install Now. WordPress will now upload and install the theme.
Activating the Theme: Once the installation is complete, you’ll see a success message with a link to activate the theme. Click Activate to apply the theme to your site.
2. Updating the Theme in WordPress Manually
Updating your WordPress theme manually doesn’t necessarily mean you have to remove the old version first. Here’s how to update a theme directly within WordPress without FTP or file manager:
- Download the latest version of the theme, ensuring it’s in a zip file format.
- Head over to your WordPress admin area and navigate to Appearance > Themes.
- Click on the Add New button at the top of the page, then select the Upload Theme button.
- Choose the zip file of the latest theme version from your computer and click Install Now.
3. Installing the Theme via File Manager and Host
For users who prefer or need to bypass the WordPress admin interface, themes can also be installed directly through the file manager provided by your hosting service or via FTP. Here’s a general outline of the steps:
Prepare the Theme File: Extract the theme’s zip file on your computer. You should have a folder named after your theme, containing all its files and folders, including
style.css.Upload the Theme: Using your hosting control panel’s file manager or an FTP client, upload the theme folder to the
wp-content/themesdirectory of your WordPress installation.Activate the Theme: Once uploaded, go back to your WordPress dashboard, navigate to Appearance > Themes, and you should see your new theme listed there. Hover over it and click Activate.
4. Updating a WordPress Theme via File Manager and Hosting Service
When updating a WordPress theme via your hosting service’s file manager, a manual approach is required. This process involves deleting the old version of the theme and uploading the updated one. Follow these steps to ensure a smooth update:
Back Up Your Website: Before making any changes, ensure you have a complete backup of your website. This includes your database and all WordPress files. Most hosting providers offer tools to create backups, or you can use WordPress plugins designed for this purpose.
Download the Latest Theme Version: Obtain the updated version of your theme, usually from the theme developer’s website. The theme should be in a
.zipformat.Access Your Hosting File Manager: Log in to your web hosting account and navigate to the file manager. The file manager allows you to manage your site’s files directly from your hosting dashboard.
Navigate to the Themes Directory: Within the file manager, find your way to the
wp-content/themesdirectory. This folder contains all the themes you’ve installed on your WordPress site.Delete the Old Theme Version: Locate the folder of the theme you wish to update and delete it. Be very careful to ensure you’re deleting the correct theme folder. This action cannot be undone through the file manager, which is why a backup is crucial.
Upload and Extract the New Theme Version:
- Click on the Upload button in the file manager and select the zip file of the new theme version from your computer.
- After the upload is complete, navigate to the uploaded zip file in the
wp-content/themesdirectory. - Extract the contents of the zip file, which should automatically create a new folder with the updated theme.
Verify the Update: Log into your WordPress dashboard and go to Appearance > Themes. You should see the updated theme listed. Activate it if it isn’t already, and then visit your website to ensure everything is functioning as expected.
Check for Issues: After activating the updated theme, it’s a good idea to check your website for any issues. Navigate through various pages to ensure that everything loads correctly and that there are no visible problems.
By following these steps, you can manually update your WordPress theme using the file manager provided by your hosting service. Remember, taking precautions such as backing up your website and carefully following each step can help mitigate risks and ensure a successful update.
Additional Tips
- Check Theme Compatibility: Always ensure the theme is compatible with your version of WordPress to avoid potential issues.
- Use Child Themes for Customizations: If you plan on making customizations, consider using a child theme to preserve your changes during updates.
- Understand Theme Documentation: Many themes come with detailed documentation. Reviewing this can help you understand all the features and customization options available.
Remember, adding screenshots to this article will significantly enhance understanding and provide visual guidance, making the manual installation process more accessible to your users.
Conclusion
Manually installing WordPress themes offers a level of control and understanding of the inner workings of your website. Whether through the WordPress admin panel, updating existing themes, or using the file manager and host, each method provides valuable insights into the structure and management of WordPress themes. Remember, the key to a successful theme installation is ensuring you’re working with the correct zip file. With this guide and the addition of illustrative screenshots, you’re well on your way to transforming your WordPress site with new themes, confidently overcoming common obstacles along the way.
